How to Easily Convert Your Blog to Video with AI Tools


You can turn a blog into a video in just minutes with ai tools. Just drop your article into a blog to video platform, and watch as the tool creates a video for you. You get to customize the look, add your voice, and share it anywhere. Don’t worry if you’ve never tried to convert blog to video before. Anyone can turn a blog into a video, and this article will show you how simple it is to use blog to video tools.
Why Turn a Blog into a Video
Boost Engagement
You want people to care about what you write. Turning your blog into a video helps with this. Videos catch people’s eyes with sound and pictures. People like videos because they are simple and fun to watch. Videos are also easy to share with friends. Here are some reasons why videos help people pay attention:
Videos help 96% of users learn about products or services.
89% of people say a video made them buy something.
Videos with real people or stories make stronger feelings.
Adding a video to your article makes it more interesting. It gives your readers a new way to hear your message. Many brands, like ATH Sport, use video to tell their story better than words alone.
Expand Reach
You can reach more people by turning your blog into a video. Videos are easy to post on social media. People like to share short videos on Instagram, TikTok, and YouTube. This helps your article get seen by new people. Making your blog into a video saves time and keeps your message the same everywhere.
Tip: Post your video on your website, newsletter, and all your social media to get more views.
Here’s how video helps you reach more people:
Videos make your blog posts more fun and keep people on your site longer.
Videos are easy to share on social media, so more people visit your site.
You can share your videos on your own pages, with others, or through ads.
Video analytics show what works best and help you reach even more people.
Improve Accessibility
Videos help everyone enjoy your content. Many people watch videos with no sound, so captions are important. Captions and subtitles help people who are deaf, hard of hearing, or speak another language. They also help people who learn better by watching and listening.
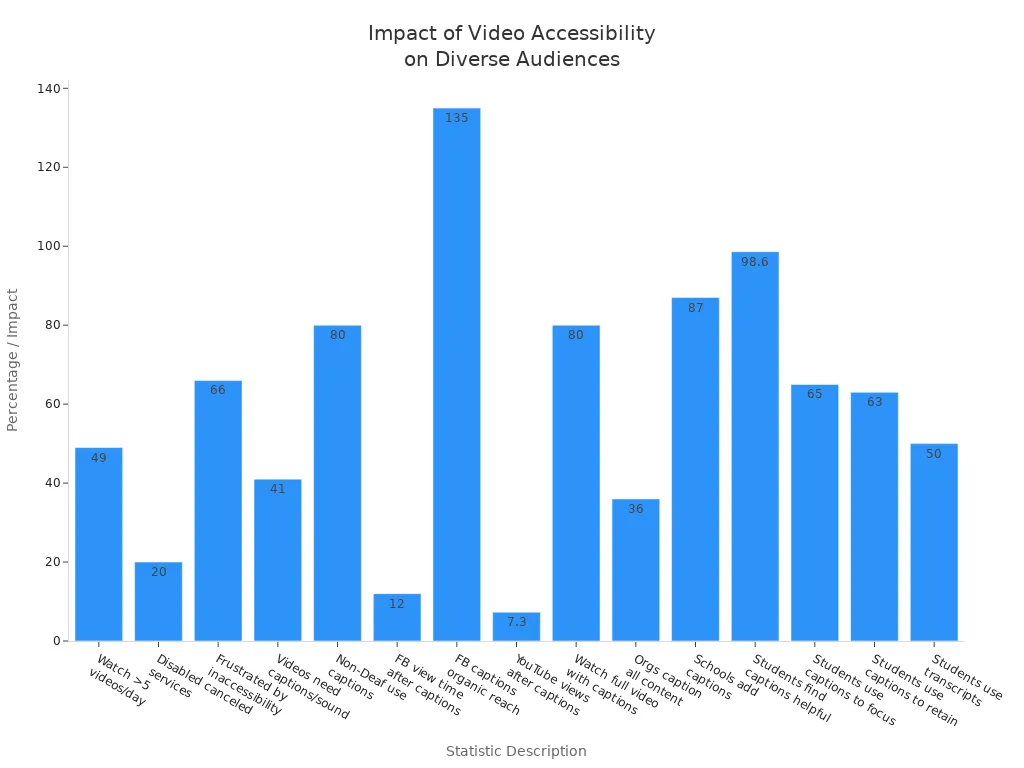
Look at these facts about video accessibility:
Statistic Description | Data / Impact |
|---|---|
People who use captions but are not Deaf or hard of hearing | 80% |
Increase in YouTube video views after adding captions | 7.3% |
Facebook videos with captions have greater organic reach | 135% |
Viewers more likely to watch entire video with captions | 80% more |
Students finding captions helpful | 98.6% |
When you add video to your article, more people can understand your message. You also make your content better for everyone, not just people with disabilities.
Steps to Convert Blog to Video Using AI Tools
Step 1: Choose the Right AI Tool
Factors to consider when selecting an AI tool.
Picking the right AI tool is the first step to convert a blog to a video effectively. Not all tools are created equal, so you’ll want to evaluate them based on specific criteria. Here’s a quick guide to help you decide:
Criteria | Description |
|---|---|
Accuracy and Quality | Look for tools that ensure high transcription accuracy and maintain the original blog’s intent. |
Ease of Use | Choose a tool with a user-friendly interface and minimal learning curve. |
Features and Customization | Check for editing options and the ability to customize tone, style, and visuals. |
Integration and Compatibility | Ensure the tool integrates seamlessly with your existing systems and supports various file types. |
Cost and Value | Compare pricing models and look for free trials or demos to test the tool. |
Support and Updates | Opt for tools with reliable customer support and regular updates to stay ahead of trends. |
Some popular options include Boolvideo. It has unique features that make it stand out. The tool makes it easier to create videos from blog articles without requiring advanced technical skills.
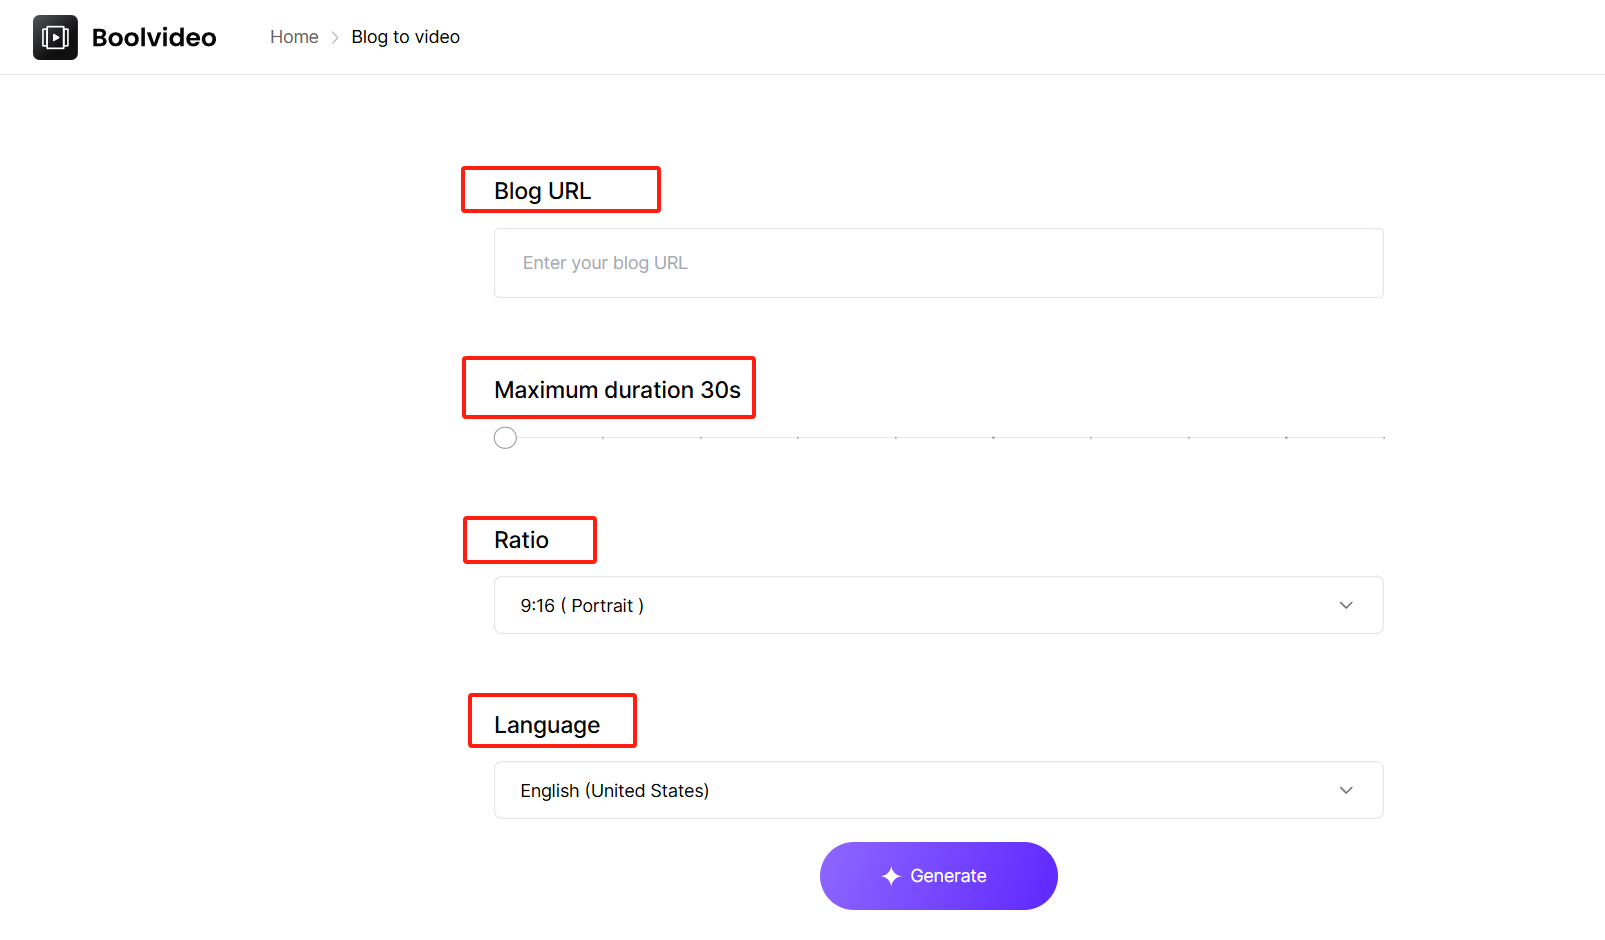
Step 2: Input Your Blog Content
How to upload or paste your blog into the AI tool.
After you click on this screen, there will be four options. In the first place, you can enter the URL of your blog and set the required video generation ratio, language (the market you are targeting), and video duration. Then you can click "Generate" and wait for one to two minutes. The video you need will be generated~
Tips for formatting your blog for optimal results.
To get the best results, follow these formatting tips:
Use clear alt text for any images in your blog.
Double-check grammar and spelling to ensure readability.
Write a strong introduction and conclusion to keep viewers engaged.
Organize your content logically so the AI can structure the video effectively.
Keeping your blog concise and well-organized helps the AI tool turn your blog into a video that’s both engaging and visually compelling.
Step 3: Customize the Video
Add visual effects, animations, and voiceovers.
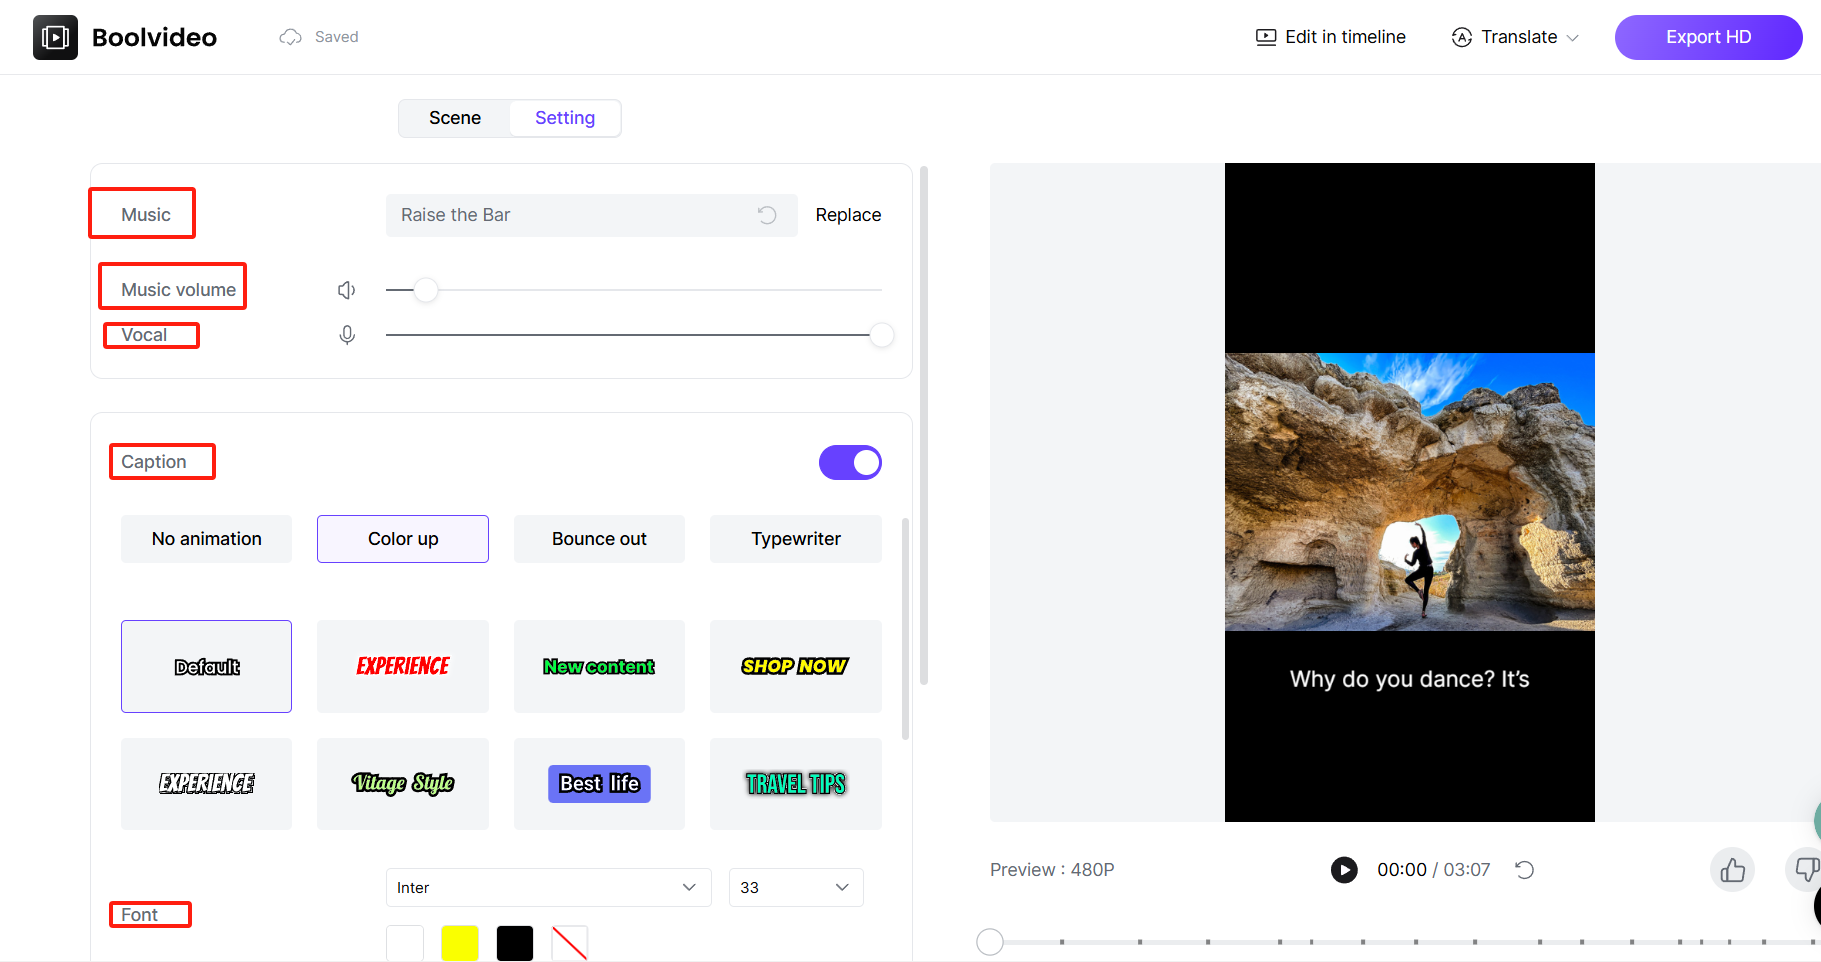
If you feel that the generated video is not perfect enough, you may want to polish it again. Boolvideo allows you to add visual effects, animations, and voiceovers to make your videos stand out. For example, the image presented to you now is the storyboard of your video. On the left, we have listed your shots in the order of the video, and you can freely switch the order of these shots or add new ones, among other operations.
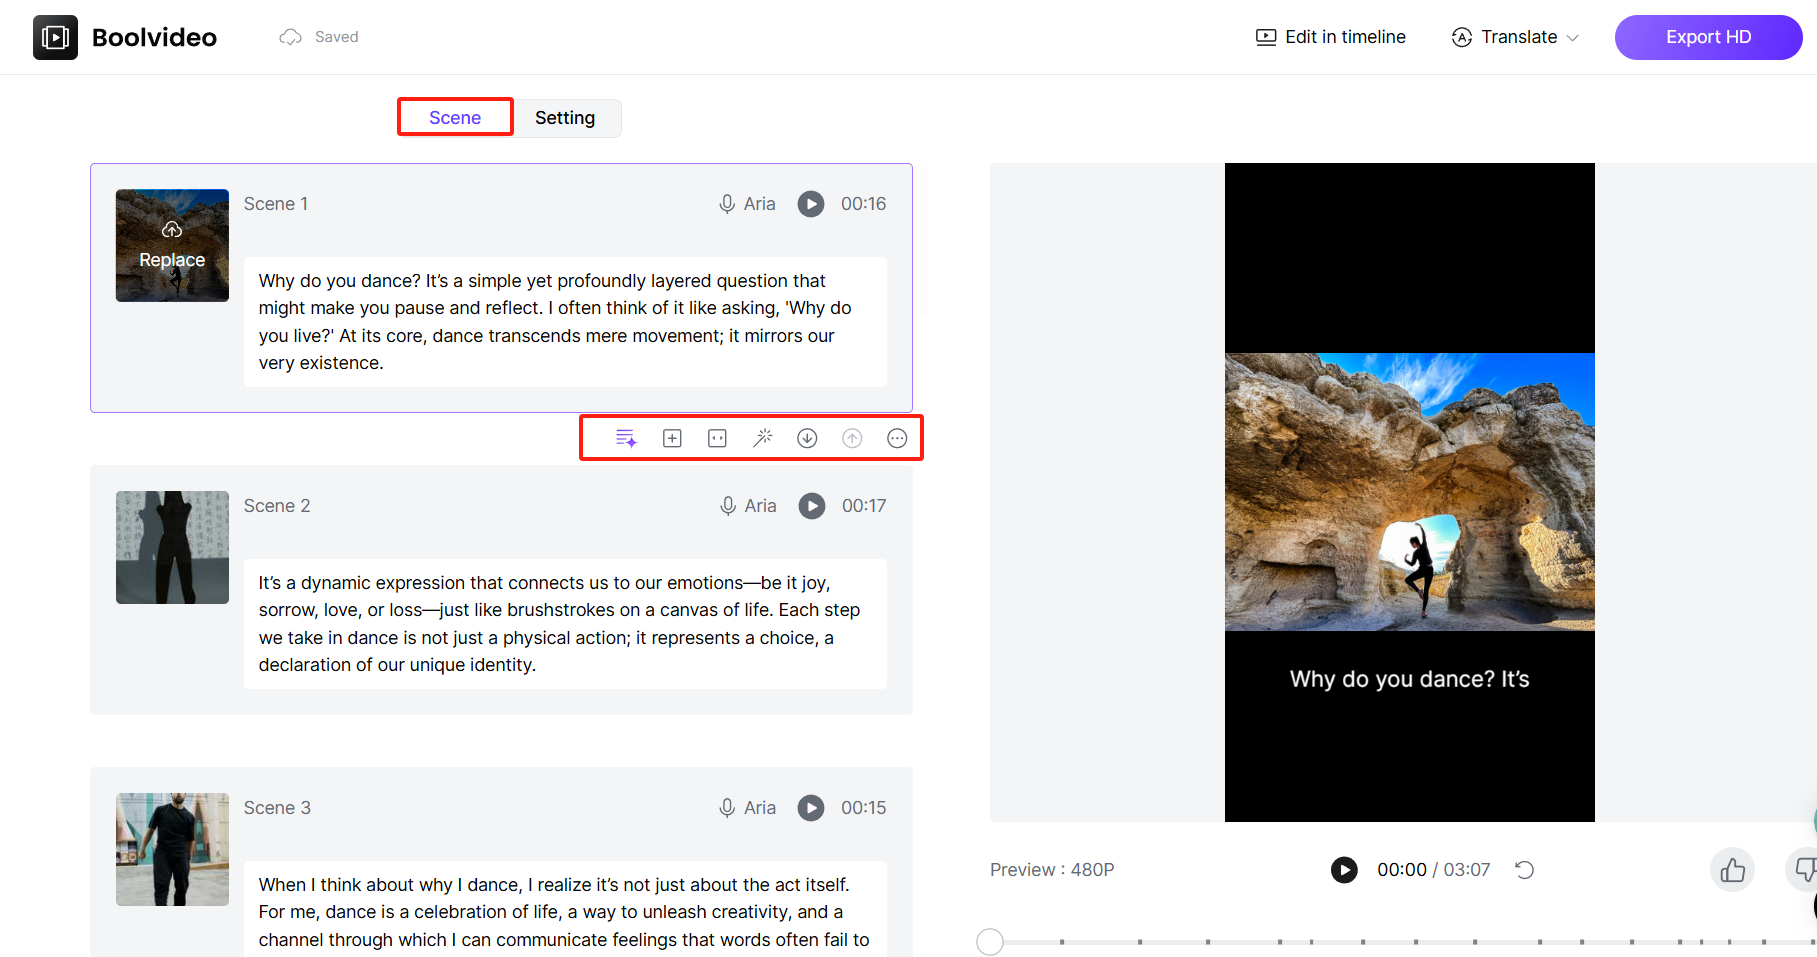
Adjusting some details will make your video more appealing
If you have already made adjustments in this section, you can click on "Settings", where you can make more detailed adjustments to the specific details of the video. For example, changing different filters, adding some new small elements, changing your background music, changing the cover of the video, and so on.
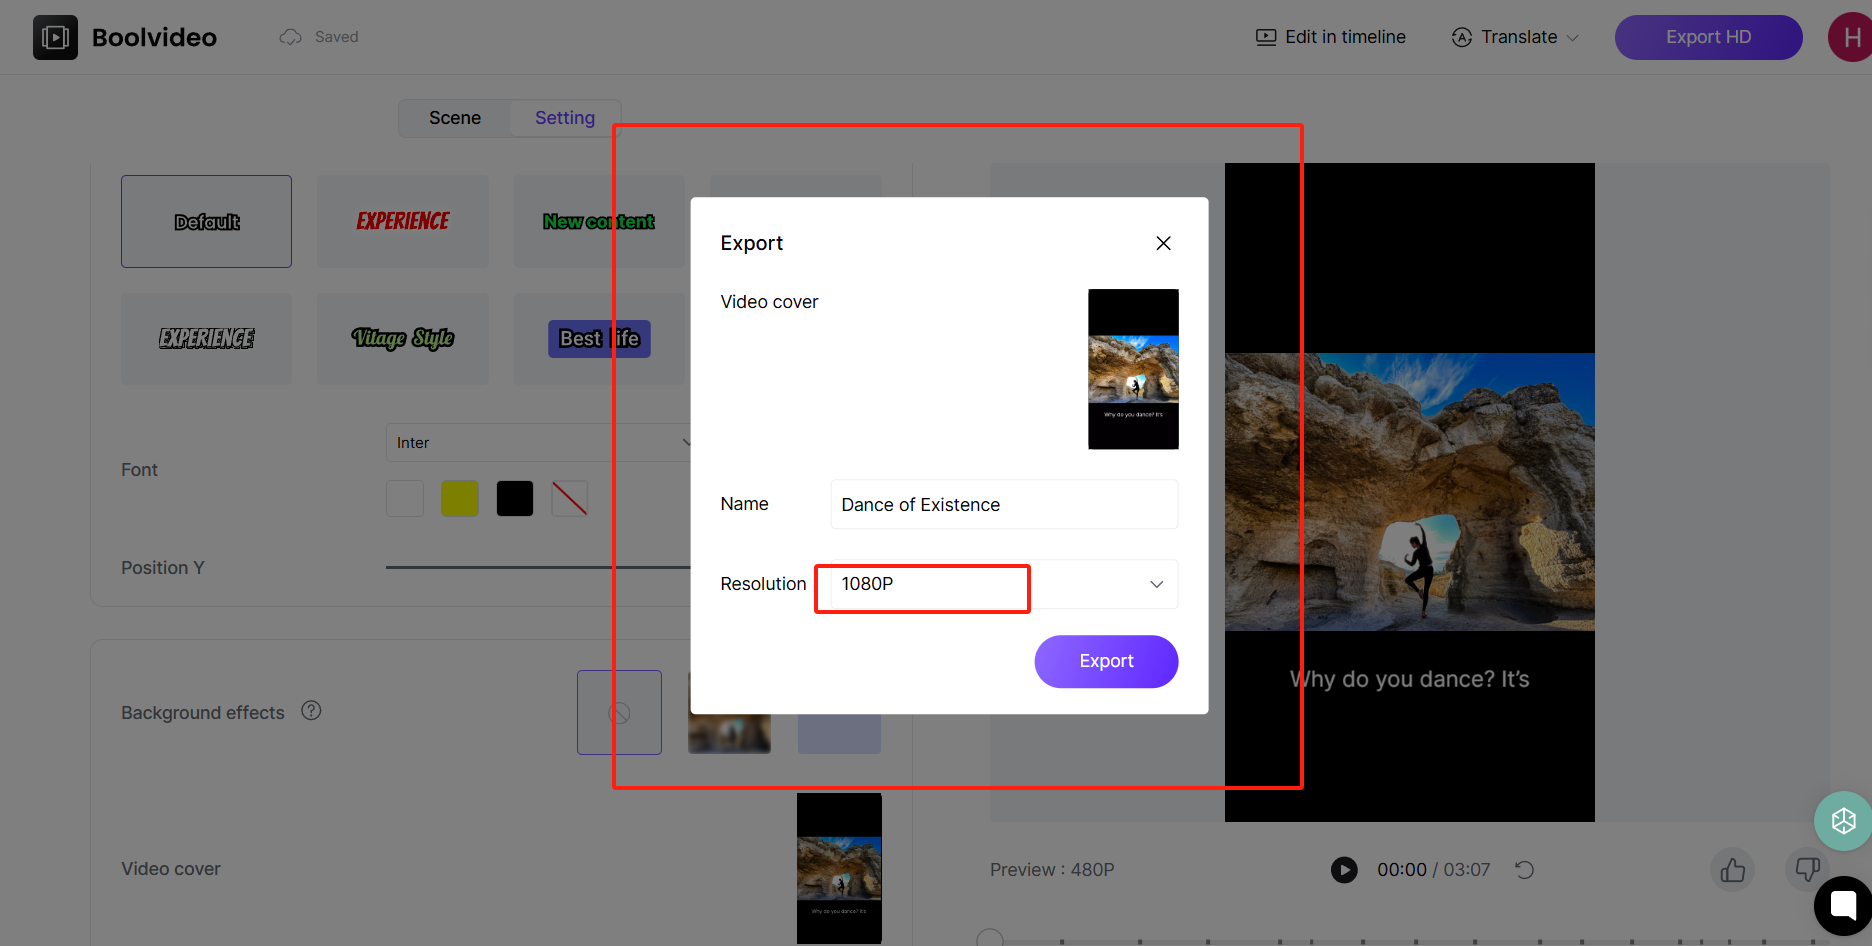
Exporting the video in the desired format.
After completing these steps, you can choose to export the finished video.Some tools even let you optimize the video for specific platforms. For instance, you can export a square video for Instagram or a horizontal one for YouTube. This flexibility saves you time and ensures your video looks great wherever it’s posted. After exporting, preview the file to confirm everything looks as expected. Then, you’re ready to share your creation with the world!
Compare AI Tools to Convert Blogs to Videos
Features Overview
There are many ai tools for turning blogs into videos. Each tool has something different to offer. Some tools work very fast. Others let you change how your video looks. Many platforms use a text-to-video generator. This means you can make a video from your blog in just a few clicks. Most tools let you use templates, add your brand, and pick voices or avatars.
Here’s a quick look at some popular options:
AI Tool | Unique Features | Pros | Cons |
|---|---|---|---|
Large media library, customizable templates | Easy to use, fast results | Watermark on free plan | |
Synthesia | AI avatars, 120+ languages, collaboration | Great for global teams, avatars | Limited features on basic plan |
Murf | AI voices, tone and speed control | Many voice options, easy editing | Some voices sound less natural |
Descript | Audio/video editing, overdubbing, transcription | Powerful editing, saves time | Steeper learning curve |
Some tools are best for avatars and languages. Others are better for editing or using templates.
Pricing and Free Plans
Most ai tools have a free plan, but there are limits. Free plans may put watermarks on your videos. You might only make short videos or have fewer ways to export. Paid plans give you more features. You can make longer videos, get better quality, and remove watermarks. Some tools, like LTX Studio and Veed.io, let you try basic features for free. You need to pay for more advanced options.
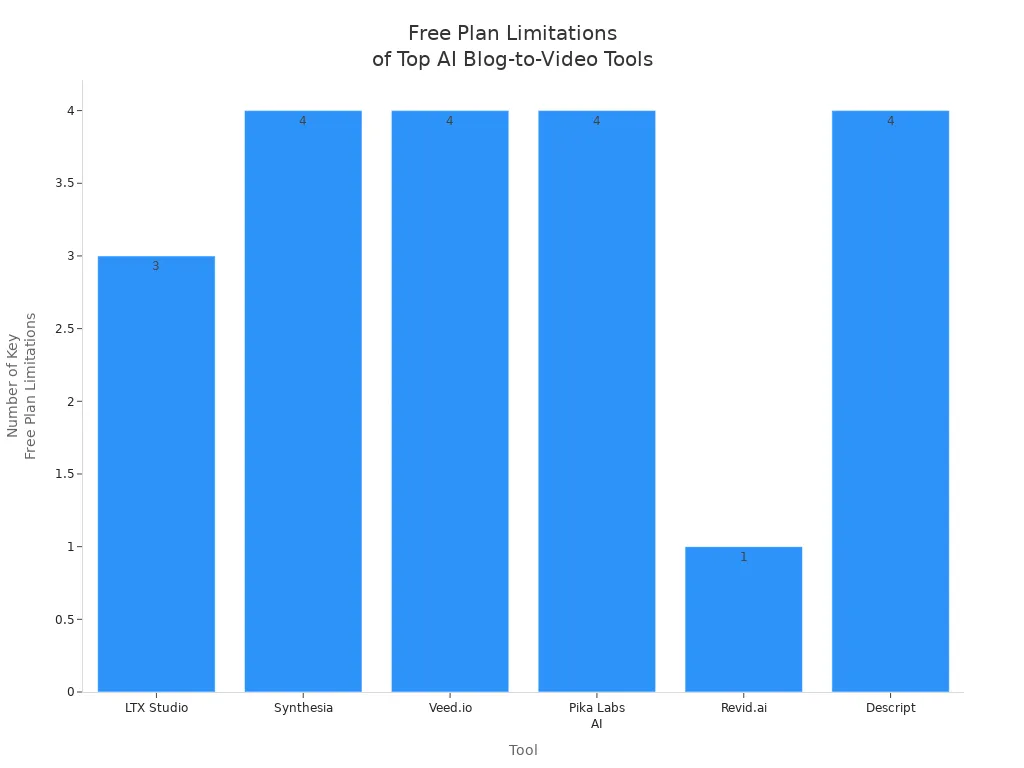
Paid plans usually cost about $10 to $30 each month. You get more video credits and better export quality. You also get more templates to use. If you want to use your videos for business, you need a paid plan for commercial rights.
Best Use Cases
Pick the right tool for what you want to do. If you need many languages, Synthesia is a good choice. It has over 120 languages and digital avatars. For quick social media videos, Blaze helps you keep your brand style and work faster. If you want to automate scriptwriting or reuse content, ChatGPT or Langflow can help. Pictory is good for simple text to video with stock footage and voiceovers.
Match the tool to your goal. Some tools are best for teaching. Others are better for marketing or team training. Try a few tools to see which one is easiest for you.
Optimize Video Generation Using AI for Platforms
YouTube Optimization
When you create video content for YouTube, you need to follow some special rules. YouTube asks you to tell viewers if your video uses AI to show things that never happened or makes people say things they did not. This is very important for topics like elections or health. If you do not tell YouTube about AI changes, your video could get removed or your channel could face penalties. YouTube adds labels to your videos so viewers know when content is synthetic. If someone’s face or voice appears in your video because of AI, they can ask YouTube to take it down. YouTube uses AI to check for harmful or fake videos and keeps improving these tools to protect everyone.
Tip: Always add subtitles to your YouTube videos. Subtitles help more people understand your message, even if they watch with the sound off. They also boost your reach and make your videos easier to find on social media.
TikTok & Instagram Tips
TikTok and Instagram love short-form videos. For TikTok, use a vertical 9:16 format and keep your videos quick and fun. Instagram works best with square or vertical videos, especially for Stories and Reels. Add SRT subtitle files with big, clear fonts like Arial or Helvetica. Keep subtitles short and easy to read. Use hashtags and user tags in your subtitles to get more views and likes. Subtitles help people who watch without sound and make your videos easier to find on social media. AI-powered captions also help people who have trouble hearing or understanding accents.
Here are some quick tips:
Use subtitles with 2-3 lines per screen.
Match the font and color to your brand.
Keep videos under 60 seconds for TikTok and Instagram Reels.
Add keywords and hashtags to boost SEO and engagement.
Engagement Boosters
You want your videos to stand out on social media. Subtitles can increase watch time, reactions, and shares. Shorter videos with captions keep people watching longer. Subtitles also help people understand different accents and make your video content more accessible. Try using AI to automate comments and replies on your posts. This helps you connect with your audience and grow your followers. Use AI to target the right hashtags and topics. Keep your brand’s voice the same in every post. Real-time AI tools can spot new ways to engage with your viewers fast.
Factor | How It Helps Engagement on Social Media |
|---|---|
Subtitles | |
Voiceover Accents | Subtitles help everyone understand your video |
Video Length | Short videos with captions keep viewers longer |
Remember: The more you share on social media, the more people you reach. Use AI tools to save time and keep your videos fresh and fun.
Troubleshooting Blog to Video Conversion
Common Issues
You might run into a few bumps when turning your blog into a video with AI tools. Sometimes, the software just does not work right. Maybe your computer is too slow, or the program is out of date. This can cause your video to look bad or not finish at all. Bugs and glitches can mess up the timing or leave out parts of your video. If your blog text is too long or not clear, the AI might get confused and make a video that does not make sense.
AI tools also have trouble understanding feelings or culture. They might create videos that seem off or even use words or images that are not okay. You need to check your video to make sure it does not spread wrong ideas or stereotypes. Always keep an eye out for deep fakes or content that could be harmful.
Here are some quick tips to fix export problems:
Check if the tool is working by visiting its status page.
Wait a bit longer if your export seems stuck.
Make sure you did not move or delete any files.
Remove any strange symbols from your project names or subtitles.
Keep your project size small and use standard video sizes.
Tip: Prepare your blog text well and update your software often. This helps avoid most problems before they start.
Workflow Automation
You can save a lot of time by automating parts of your blog-to-video process. Start with small tasks, like making short demo videos or social clips. Pick tools that fit your needs and budget. For example, Designs.ai helps you create videos and social posts fast. Murf AI and Freepik's AI Voice Generator let you add natural-sounding voiceovers in many languages.
Tool Name | What It Does | Key Features |
|---|---|---|
Designs.ai | Video and design automation | Templates, AI design suggestions |
Murf AI | AI voiceover generation | Voice options, language support |
HubSpot | Marketing and workflow automation | CRM, reports, customer support |
You should always check your videos before posting. Even with automation, human review keeps your content safe and on-brand. Try using project management tools to keep your workflow organized and easy to follow.
Quality Checks
You want your videos to look and sound great. Start by checking grammar and readability with tools like Grammarly. Make sure your script is clear and easy to follow. Use captions and subtitles to help everyone understand your message. Test your video for smooth transitions, good color, and matching audio.
Plan your video before you start. Think about the story, the scenes, and the mood you want. After making your video, watch it all the way through. Look for mistakes, weird cuts, or anything that feels off. Track how people watch and share your videos. Metrics like view count, engagement, and conversion rate show what works best.
Remember: Always tell viewers if you use AI in your video. Stay honest and avoid tricks like deepfakes or fake voices. Regular updates and feedback help you keep improving your videos.
You can turn a blog into a video without any tech skills. AI tools make the process simple, just like how CommonLook lets anyone handle complex tasks with ease. When you turn a blog into a video, you open your article to more people and boost engagement. Check out these real results:
Lucky Brand and Moz saw more traffic and shares after using video.
Video testimonials help people connect and share stories.
Social media loves video, so your reach grows fast.
Try a free tool today and see how your next blog post can shine as a video!
FAQ
How long does it take to turn my blog into a video?
You can make a video from your blog in just a few minutes. Most AI tools work fast. You just paste your blog, pick your style, and let the tool do the rest.
Do I need video editing skills to use these tools?
No, you do not need any editing skills. The AI tools handle everything for you. You just follow simple steps and click a few buttons. Anyone can do it!
Can I use my own voice in the video?
Yes! Many tools let you record your voice or upload an audio file. You can also pick from different AI voices if you want something quick and easy.
Will my video have a watermark?
Some free plans add a watermark to your video. If you want videos without watermarks, you can upgrade to a paid plan. Always check the tool’s details before you start.
What if I want to change something in the video?
You can edit your video anytime. Most tools let you change text, images, music, and even the voice. Just click “edit,” make your changes, and save your new video.
See Also
Transform Your Blog Content Into Videos Using AI
Effortlessly Turn Blog Posts Into Videos With AI
Use AI Tools To Animate Your Existing Video Clips
Accelerate your video production
10X with Boolvideo