How to make an image into a moving video

Have you ever wondered how to make an image into a moving video? It’s easier than you think! With the right tools and a little creativity, you can transform any static image into a dynamic, eye-catching video. Whether you want to add subtle motion or create a dramatic effect, the process is straightforward. You’ll start by choosing a tool, applying animations to make an image into a moving video, and then exporting your masterpiece as a video. The best part? You don’t need to be a professional to achieve stunning results. Let’s dive in and bring your images to life!
Key Takeaways
Pick the best tool for your skill level. Use Adobe After Effects if you're advanced, Canva for beginners, or Pixaloop for quick mobile use.
Begin with a clear, high-quality picture. A sharp image makes your video look better and more professional.
Use small, smooth movements. This improves your image without making it too busy.
Add music and sound effects. Choose free tracks that fit the mood and match the beat to your animations for a nice finish.
Try overlays and filters. These can make your animations more creative and fun to watch.
Tools to Make an Image Move

If you’re ready to bring your images to life, the first step is choosing the right tool. Whether you prefer working on a desktop, online, or on your phone, there’s something for everyone. Let’s explore some of the best options available.
Online Tools
Boolvideo
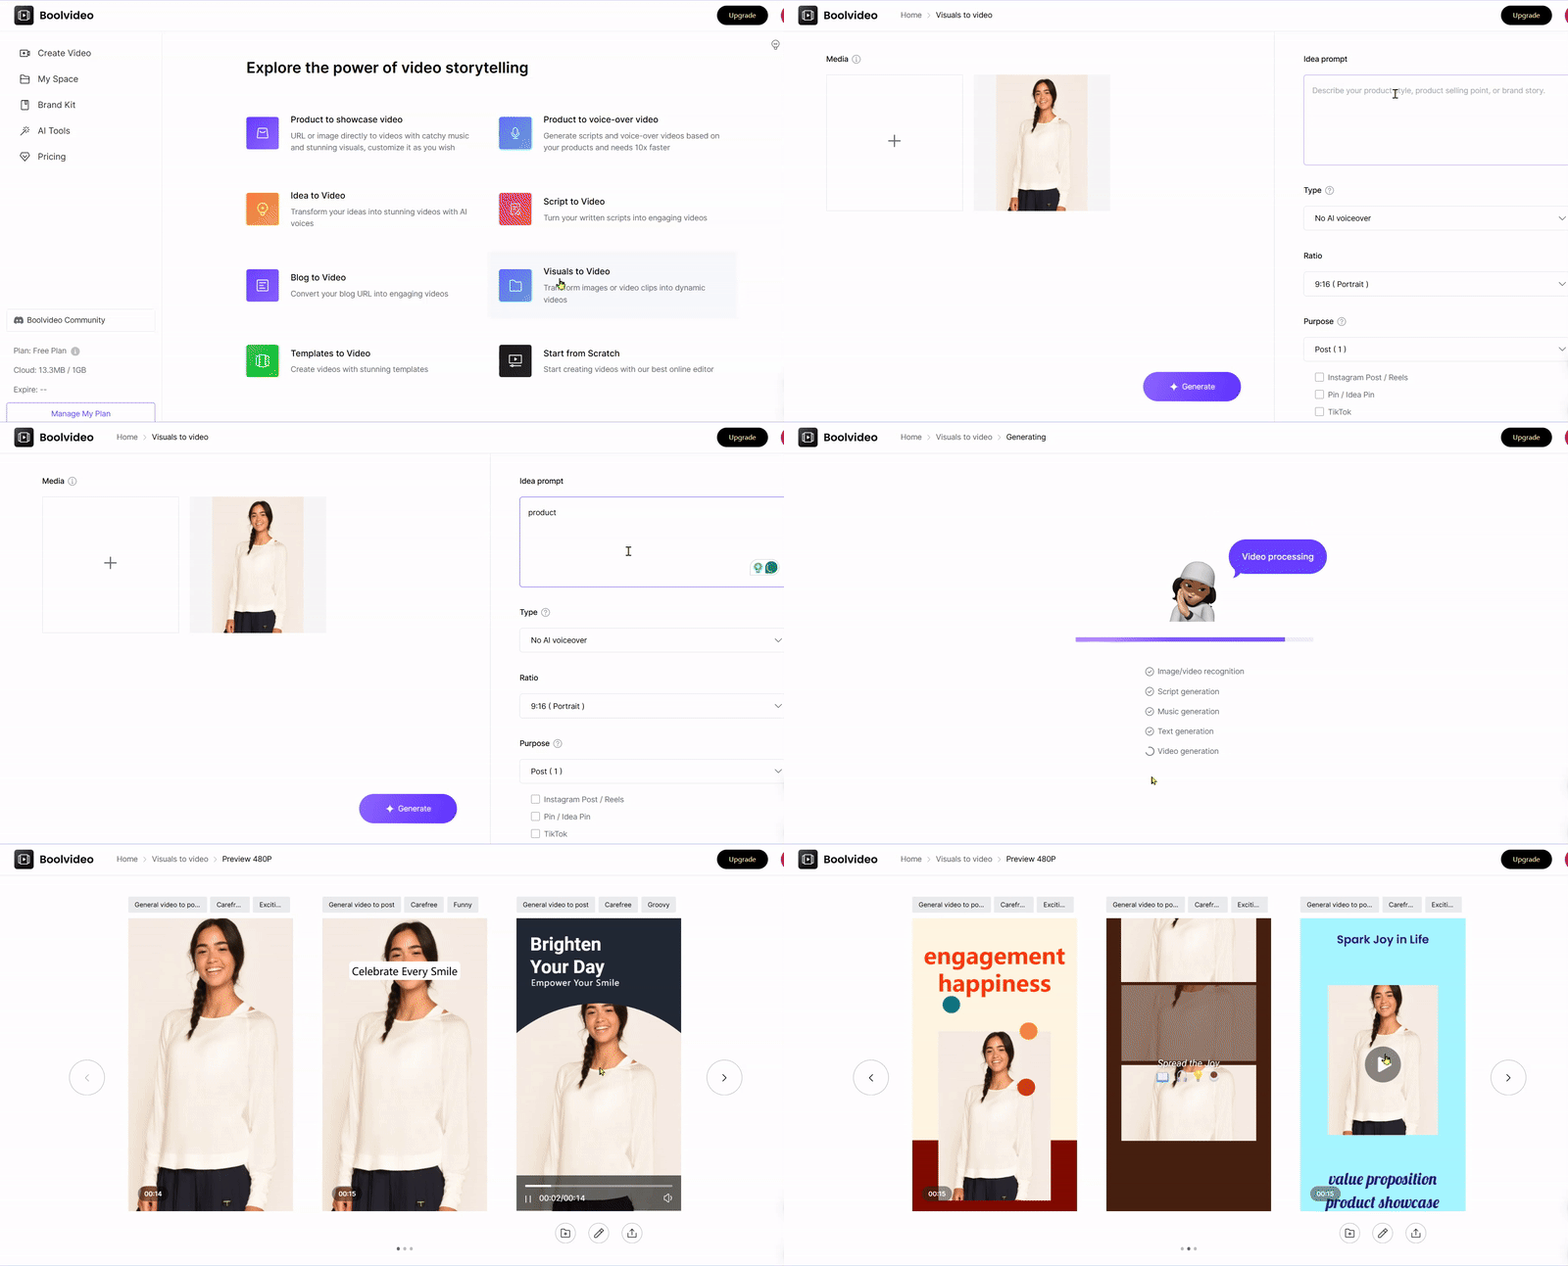
Boolvideo is an excellent choice for beginners. It has recently added new features and undergone further upgrades and optimizations. It can help you convert a static product or its product image into a dynamic video. Before upgrading, the function was to output the product URL as a dynamic product promotional video.
Create Now
Come and get your own product dynamic video
After upgrading, it can not only generate videos but also help you turn them into a dynamic video by giving it an image, making it more vivid, because, for users, dynamic visible things will look more pleasing than static things.Let's take a look at this demonstration video to give you a visual experience of its upgraded features.

Advantage | Description |
|---|---|
User Experience | Intuitive interface, perfect for beginners. |
Customization Options | Offers templates and effects to match your style. |
Cost-Effectiveness | Free tier available, with premium features for advanced users. |
Kapwing
Kapwing is another user-friendly online tool. It’s great for quick edits and offers features like motion effects, text overlays, and transitions. It’s also cloud-based, so you don’t need to worry about downloading software.
VEED.IO
VEED.IO combines simplicity with functionality. It’s perfect for creating short, animated videos for social media. You can add text, music, and effects to make your image stand out. It also supports collaboration, so you can work with a team in real time.
Desktop Software
Adobe After Effects
Adobe After Effects is a powerhouse for creating animations. It’s perfect if you want full control over your image’s motion. You can add effects like parallax, particle systems, or 3D transformations. While feature-rich, it requires a bit of a learning curve. If you’re serious about animation, this tool is worth mastering.
Pro Tip: Make sure your computer meets the system requirements for smooth performance.
Minimum specifications
Recommended specifications
Processor
Intel or AMD Quad-Core Processor
(8-Core or above for Multi-Frame Rendering recommended)
RAM
16 GB of RAM
32 GB recommended
GPU
2 GB of GPU VRAM
4GB or more of GPU VRAM recommended
Photoshop with Timeline Animation
You might already know Photoshop for editing photos, but did you know it can animate too? You can create frame-by-frame animations or add motion to layers using the Timeline feature. It’s a great option if you’re already familiar with Photoshop and want to dip your toes into animation without learning a new tool.
Note: Photoshop is ideal for simpler animations, but for advanced effects, you might need a dedicated animation tool like After Effects.
Mobile Apps
Pixaloop
Pixaloop is a popular app for animating images on the go. It lets you create motion paths, replace skies, and add overlays like sparkles or fog. The interface is intuitive, making it easy to create stunning animations in minutes.
Motionleap
Motionleap offers advanced features like 3D motion effects and particle overlays. You can animate specific parts of your image while keeping others static, giving you precise control over the final look.
CapCut
CapCut is a versatile app that’s great for both beginners and pros. It offers tools for adding motion, transitions, and even music to your images. Plus, it’s free to use, making it a budget-friendly option.
Quick Tip: Mobile apps like Pixaloop and Motionleap are perfect for creating animations on the fly. They’re easy to use and packed with features to make your images pop.
Now that you know the tools, it’s time to pick one and start experimenting. Whether you’re on a desktop, online, or using your phone, there’s no limit to what you can create!
Step-by-Step Guide: How to Make an Image into a Moving Video

Using Adobe After Effects
Importing the Image
To start, open Adobe After Effects and create a new project. Then, import your image by dragging it into the project panel or using the "File > Import" option. Once imported, drag the image onto the timeline to begin working on it. If you’re using multiple images, organize them into layers for better control.
Adding Animation Effects
Now comes the fun part—animation! Use keyframes to define the start and end points of your animation. For example, you can make the image zoom in or pan across the screen. If you want to get fancy, try motion tracking to follow moving elements or add effects like parallax for depth. Adjust the timing between keyframes to ensure smooth transitions.
Pro Tip: Experiment with different effects to make an image move in unique ways. Subtle animations often look more professional than overly dramatic ones.
Exporting the Video
Once you’re happy with your animation, it’s time to export. Open the Render Queue panel and add your project to it. Choose an output format that suits your needs, like MP4 for social media or MOV for higher quality. Adjust the resolution and frame rate to match your project’s requirements. Finally, render the video and save it to your desired location.
Quick Tip: Higher quality settings result in larger file sizes, so balance quality and file size based on your needs.
Using Pixaloop (Mobile App)
Uploading the Image
Launch Pixaloop on your phone and tap the "+" icon to upload your image. The app’s intuitive interface makes it easy to get started.
Applying Motion Paths
Use the Path Tool to create custom motion paths. For example, you can animate water to flow or clouds to drift. Want to change the sky? Pixaloop’s Sky Replacement feature lets you swap out the background for a more dynamic look. You can also add 3D motion effects to give your image depth and perspective.
Did You Know? Pixaloop allows you to animate specific parts of an image while keeping the rest static. This feature is perfect for creating eye-catching effects.
Saving the Animated Video
Once your animation is complete, preview it to ensure everything looks good. Then, save your animated video in your preferred resolution. You can share it directly to social media or save it to your device for later use.
Tips to Make a Picture Move Like a Pro
Adding Effects
Use overlays like sparkles, rain, or light leaks.
Adding overlays can instantly elevate your animated videos. They bring a touch of magic and make your moving picture effect more captivating. For example:
Blue Light Leak Overlay – Sparkle Transition: This overlay adds a soft blue light leak effect, perfect for transitions or enhancing animations.
Rain overlays: These create a dramatic or moody vibe.
Sparkles: Great for dreamy or celebratory themes.
Overlays like these can transform a simple animation into something truly eye-catching. Try experimenting with different styles to see what works best for your project.
Experiment with filters to set the mood.
Filters are another way to enhance your image movement. They can change the entire feel of your animation. Want a nostalgic vibe? Use a sepia filter. Looking for something vibrant? Go for a high-saturation filter. Filters help you tell a story and make your animations stand out. Don’t hesitate to mix and match until you find the perfect look.
Incorporating Music
Choose royalty-free music to match the theme.
Music can make or break your animation. Pick a track that complements the mood of your video. For a calm and serene animation, go for soft instrumental music. If your animation is upbeat, choose something energetic. Always use royalty-free music to avoid copyright issues. Websites like Free Music Archive or YouTube Audio Library are great places to start.
Sync the animation with the beat of the music.
Timing is everything. Syncing your animation with the beat of the music creates a seamless and professional feel. For example, if you’re animating a moving object effect, make sure its motion aligns with the rhythm. This small detail can make your ai photo animation feel more polished and engaging.
Using Transitions
Add smooth transitions between scenes or effects.
Transitions help your animation flow naturally. Some effective options include:
Fade-ins and fade-outs: These create smooth introductions and conclusions.
Motion transitions like slides and wipes: These guide the viewer’s attention and enhance storytelling.
3D transitions: These add depth and make your animation more immersive.
Smooth transitions keep your audience engaged and make your moving picture effect look professional.
Use fade-ins and fade-outs for a polished look.
Fade-ins gradually reveal your animation, while fade-outs gently close it. These are perfect for starting or ending your video. They’re simple yet effective, giving your animation a clean and polished finish.
By combining overlays, music, and transitions, you can add animation to an image and create stunning results. These tips will help you take your AI photo animation to the next level!
Avoiding Common Mistakes
When you animate a still picture, it’s easy to get carried away or overlook small details. Let’s go over some common mistakes and how you can avoid them to create a polished final product.
Keep animations subtle and not overwhelming.
It’s tempting to add lots of effects and motion, but less is often more. Overloading your animation with too many elements can make it look chaotic. Instead, focus on subtle movements that enhance the image. For example, a gentle zoom or a slow pan can create a professional and engaging effect. Avoid camera shake by keeping your movements smooth. If you’re using a mobile app or software, stabilize your animations to prevent wobbling.
Tip: Always preview your animation before exporting. This helps you spot any areas where the motion feels too busy or unnatural.
Ensure the image and video are high-quality.
Blurry images or low-resolution videos can ruin your animation. Start with a high-quality image to ensure the final video looks sharp. If you’re using a camera, set it to manual focus to avoid losing clarity during shooting. Also, aim for a frame rate of 12-24 FPS (frames per second) for smooth motion. Many tools, like Adobe After Effects or Pixaloop, allow you to adjust these settings.
Quick Fix: If your image looks pixelated, try resizing it in a photo editor before animating. This ensures it fits your project’s resolution without losing quality.
Save your work frequently to avoid losing edits.
Imagine spending hours perfecting your animation, only to lose it because of a crash. It happens more often than you’d think! Save your progress regularly, especially when working with complex tools like After Effects. Many apps and online tools have an autosave feature—make sure it’s enabled.
Pro Tip: Save multiple versions of your project. This way, you can go back to an earlier version if something goes wrong.
By avoiding these common pitfalls, you’ll be able to animate a still picture with confidence. Take your time, focus on quality, and don’t forget to save your work!
Turning a static image into a moving video is simpler than you might think. You just need to pick the right tool, animate your image, and enhance it with effects or music. Whether you’re using professional software or a mobile app, the possibilities are endless. Don’t be afraid to experiment! Try different tools and techniques to make an image move in unique ways. With practice, you’ll master how to make an image into a moving video that looks professional. So, grab your favorite tool and start creating. You’ve got this!
FAQ
What is the easiest tool for beginners to animate an image?
Boolvideo is the easiest tool for beginners. Its drag-and-drop interface and pre-made animations make it super simple to use. You don’t need any prior experience to create stunning moving images. Plus, it offers a free tier to get started.
Can I animate an image without downloading software?
Yes! Online tools like Kapwing and VEED.IO let you animate images directly in your browser. These platforms are user-friendly and don’t require installation. Just upload your image, apply animations, and download the final video.
How do I choose the right animation tool?
Pick a tool based on your needs. For professional results, go with Adobe After Effects. If you want something quick and easy, try Canva or Pixaloop. Consider your skill level and the features you need before deciding.
Can I add music to my animated image?
Absolutely! Most tools, like CapCut and VEED.IO, let you add music to your animations. Choose a royalty-free track that matches your video’s mood. Sync the animation with the beat for a polished look.
Do I need a high-quality image to start?
Yes, starting with a high-quality image is crucial. Low-resolution images can look blurry when animated. Use a sharp, clear image to ensure your final video looks professional and visually appealing.
See Also
Creating Engaging Faceless Videos: A Comprehensive Guide
Using Slow Motion to Improve Your Video Quality
Streamlining Video Production for Marketers in 2025


