How to Make Videos from Blogs with the Latest AI Technology

Ever wanted to make your blog come alive? Now you can use AI to quickly turn articles into videos. You don’t need fancy skills or expensive tools. Just pick a blog to video platform, add your content, and watch your words transform. AI handles the hard parts, so you get polished videos in minutes. This process feels simple and fast, even if you’re just starting out.
Blog to Video Tools

AI Platforms
You have a lot of choices when it comes to turning your blog into a video. Some of the most popular AI platforms include Google Veo, Runway, Kling AI, HeyGen AI, Pika, and Invideo AI. Each tool has its own strengths. For example, Google Veo creates high-quality videos but costs more and is only available in the US. Runway is packed with features and has a strong community, making it great if you want more control. Kling AI gives you realistic lip-sync at a good price, but it takes longer to make each video. HeyGen AI stands out for its lifelike avatars, while Pika is perfect for fun, social media clips. Invideo AI helps you make ad-style videos fast with lots of templates.
If you care about user experience, Synthesia AI is a top pick. It scores 4.8 out of 5 for user satisfaction and is easy to use, even for beginners. Other tools like Runway and Invideo AI are also popular, but they might take a bit more time to learn.
Tip: When picking a blog to video tool, think about your content type, how much you want to customize, and your budget. Some tools are better for quick social clips, while others are best for detailed, branded video content.
Script and Voice Options
Most AI platforms make it easy to turn your blog into a video. You can paste your blog link or text, and the tool will break it into scenes. Advanced tools use smart language processing to match visuals and audio with your script. You get to pick from many voiceover options, including different accents, languages, and even emotional tones. Some platforms, like Tagshop and Synthesia, let you add background music that fits your video’s mood. This means your blog to video project can sound as good as it looks.
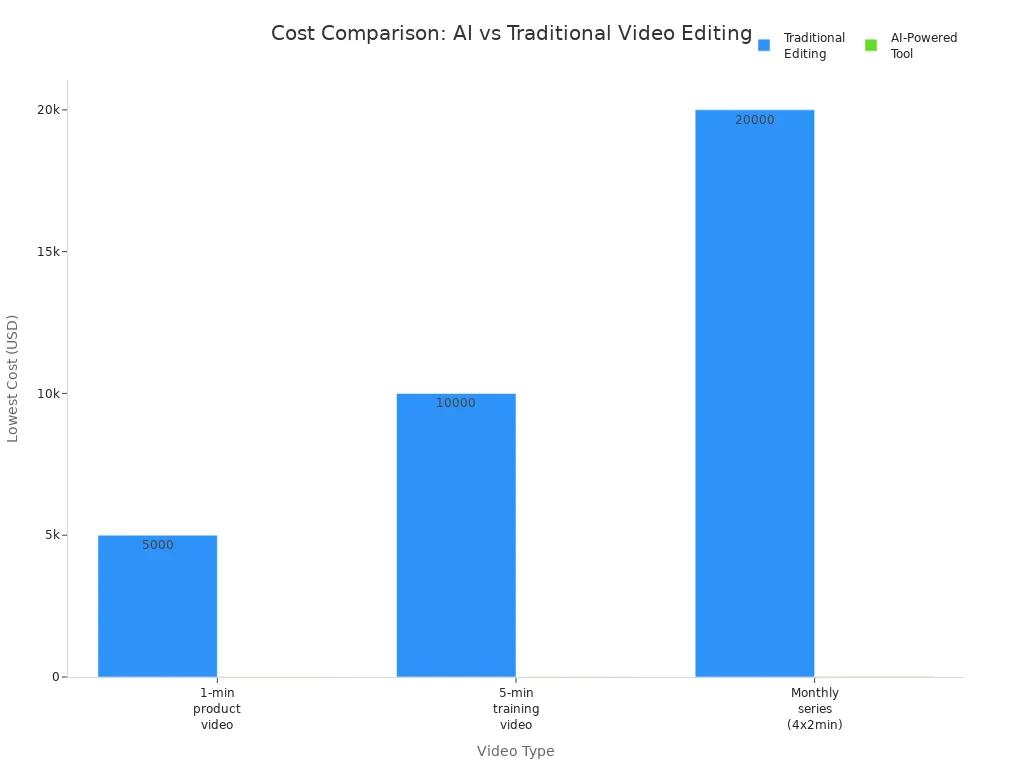
AI-powered tools also save you money. Instead of paying thousands for a professional editor, you can make a video for just a few dollars. You don’t need a big team or fancy equipment. With these tools, you can create and share videos faster and reach more people.
Video Generation Workflow
Turning your blog into a video can feel like magic, but there’s a clear process behind it. Let’s break down the steps so you can see how easy video generation can be.
Input and Summarize Content
You start by choosing your blog post. Most AI tools let you paste the blog URL or copy the text right into their platform. The AI scans your content and pulls out the main ideas. It then creates a script that works for video narration. This script usually sounds more like someone talking, not just reading from a page.
Here’s a simple step-by-step guide:
Find a video script template that fits your style. Many tools offer templates that separate visuals and audio, making things easier.
Use the AI to turn your blog into a draft script. The AI summarizes your content, but you should always check for accuracy and add your own touch.
Edit the script so it sounds natural when spoken. Try to keep the message clear and easy to follow.
The AI matches your script with scenes, images, or video clips. Some tools even suggest stock footage or generate visuals for you.
Note: AI-generated scripts are fast and consistent. They capture the main points, but sometimes miss the small details or special tone of your writing. You get the best results when you review and tweak the script before moving on.
Customize Video Style
Now comes the fun part—making your video look and sound just right. AI video generation tools give you lots of ways to customize your video content. You can pick from different templates, change colors, add your logo, and choose music that fits your mood.
Here’s a table showing some popular customization options and how they help your videos stand out:
Customization Option | What It Does | Why It Matters |
|---|---|---|
Editable Templates | Pre-made layouts you can change | Keeps your brand style consistent |
Text, Colors, Transitions | Change fonts, colors, and how scenes switch | Makes your video more eye-catching |
Avatars | Add digital presenters or talking heads | Adds a personal touch |
Multi-language Support | Create videos in many languages | Reaches a bigger audience |
Captions & Calls to Action | Add subtitles and clickable prompts | Helps with accessibility and sharing |
Manual Tweaking | Adjust timing, audio, and visuals after AI editing | Lets you perfect the final product |
Some tools, like Vizard, even let you rearrange layouts and spotlight speakers. You can add animations, talking head avatars, or dynamic visuals to keep viewers interested. If you want your video to reach people around the world, try multi-language support and captions.
Tip: The more you personalize your video, the more likely people will watch and remember it. Small changes, like adding your brand colors or a catchy intro, can make a big difference.
Preview and Export
Once you finish customizing, it’s time to see your work in action. Most platforms let you preview the video before you export. Watch the whole thing and listen to the voiceover. Check for any mistakes or awkward moments. Make sure the visuals match the script and the pacing feels right.
If you spot something off, go back and fix it. AI makes editing quick, so you can try different versions until you’re happy. When everything looks good, hit export. You can download the video in different formats or share it straight to YouTube or social media.
Here’s a quick checklist for this stage:
Preview the full video and listen for errors.
Check that the visuals and audio line up.
Make sure your branding is clear.
Export the video in the format you need.
Share your new video with your audience!
Video generation with AI saves you time and effort. You can turn a single blog post into engaging video content that reaches more people. With a little practice, you’ll get faster and better at the process.
Quality and Personalization
Edit and Review
You want your AI video to look good and sound clear. Watch the whole video from beginning to end. Listen for any weird pauses or words that sound off. If you find mistakes, fix them right away. Try editing in steps. First, check if the facts and order make sense. Then, look at the style and how it sounds. Last, make sure it is easy to follow. Always check facts using trusted sources. This keeps your video correct and helps people trust you.
AI tools help you make your video better. Many platforms have features like automatic captions, noise removal, and background blur. These tools make your video look more professional and easier to watch. You can use smart summarization to show the best parts. Some tools split your video into chapters, so viewers can find what they want fast.
Editing Feature | Description | Example AI Tool(s) |
|---|---|---|
Makes the video look sharper | Topaz Video AI | |
Background Removal | Changes or takes out backgrounds | Runway |
Captioning | Adds subtitles for people who need them | Descript |
Scene Detection | Finds and fixes video cuts | Adobe Premiere Pro |
Tip: Use automatic checks to find problems fast, but always watch your video yourself before sharing.
Branding Touches
Branding helps your video stand out and supports your marketing. Add your logo to every video you make. Use your brand’s colors and fonts to keep things the same. Start with a strong visual, like an animation or cool intro. This gets people’s attention right away. Motion graphics and text on the screen help show important points and guide viewers.
Here are some ways to make your brand stronger in videos:
Upload your logo so you can use it easily.
Stick to your brand’s main colors.
Pick AI avatars or voices that fit your brand.
Make custom intros and outros for a pro look.
Use batch editing to keep all your videos matching.
Make your videos personal by picking voice tones that fit your brand. Change the speed and add music that matches your message. Always add a clear call-to-action so viewers know what to do next. When your branding is strong, your video marketing works better and people remember it.
Useful tool: Boolvideo
Boolvideo is a helpful tool if you need to make marketing videos fast. You can turn product info into good-looking videos with one click. Boolvideo uses smart tech and deep learning to make videos that look nice and help with brand marketing. It stores your videos in the cloud, so you can get them anywhere.
Boolvideo is fast and saves time. You get good marketing results, but you cannot change small details or tell stories in your own way. If you want more control, other tools like AutoTuber AI let you pick backgrounds, music, and voices that fit your brand. Boolvideo is best when you need lots of videos quickly for your marketing.
Automation and Scaling
Batch Processing
You want to save time and reach more people with your videos. Batch processing lets you turn many blog posts into videos at once. You do not have to repeat the same steps for each post. Just set up your video templates, and the AI will handle the rest. You keep your branding the same across all your videos. You can even apply edits, transitions, and effects to a whole group of videos in one go.
Many tools help you work faster:
Use batch editing to add effects and transitions to many videos.
Render videos in the cloud to save time.
Pull in stock images, music, and video clips with one click.
Generate scripts and voiceovers using text-to-speech.
Make sure your videos look good on phones and computers.
Add titles, descriptions, and subtitles for better search and accessibility.
Stack AI lets you convert multiple blog posts into videos at the same time. This means you can scale your video marketing strategy without extra work. You can create training videos, event promos, or even customer onboarding content in bulk. Personalized marketing videos and lead nurturing become much easier when you can make video content automatically.
Tip: Batch processing helps you keep up with your content calendar and never miss a chance to connect with your audience.
Integrations
You can make your workflow even smoother with integrations. Tools like Zapier or Make connect your blog to video platform with other apps. For example, you can set up a trigger so that when you publish a new blog post, the system grabs the text, creates a video, and uploads it to YouTube or social media—all without you lifting a finger.
Here’s how a typical integration works:
Create a video template with dynamic elements.
Set up a trigger, like a new blog post.
Use the trigger data to fill in your video template.
Let the AI tool generate the video content automatically.
Share the finished video by email or post it online.
Scheduling features help you plan when your videos go live. You can set videos to publish at the best times for your audience. Minvo and InVideo let you schedule and post videos across platforms, so your video marketing strategy stays on track.
OpenAI models make scaling even easier. They split the work into steps like planning, scriptwriting, and narration. This teamwork between AI models helps you create professional videos fast. You can go from one video to hundreds in just a few clicks. Sora, for example, turns text into high-quality videos in minutes, making it simple for small businesses and educators to scale up.
Note: Automation and integrations let you focus on your message, not the busywork. You get more done and grow your reach with less effort.
You can turn your blog into videos in just a few steps with AI. These tools save you hours, help you reach more people, and keep your brand message strong.
Enjoy faster video creation and lower costs
Scale up your content for social media, email, and websites
Get started easily, even if you’re new to video editing
Try making a video from one blog post. You’ll see how simple and powerful AI can be for your content strategy!
FAQ
How long does it take to turn a blog into a video with AI?
Most AI tools can make a video from your blog in just a few minutes. You only need to add your blog and pick your style. The rest happens fast!
Can I use my own voice in the video?
Yes, you can! Many AI platforms let you upload your own voice recording. You can also pick from different AI voices if you want something quick.
Do I need video editing skills to use these tools?
No, you don’t need any editing skills. The AI does the hard work for you. You just follow simple steps and make small changes if you want.
Will my video look good on social media?
Absolutely! AI tools give you templates for YouTube, Instagram, and TikTok. You can pick the right size and style for each platform. Your videos will look great everywhere.
See Also
Effortlessly Transform Blog Content Into Videos Using AI
Step-By-Step Guide To Turning Blogs Into Videos With AI
Using Artificial Intelligence To Create Captivating Video Content
Master Crafting Eye-Catching AI Video Advertisements In 2025
Accelerate your video production
10X with Boolvideo